
Open floor plans and shared spaces create problems when privacy or separate areas become necessary. Many homeowners struggle with dividing rooms without expensive renovations or permanent construction. Learning diy room divider techniques helps create functional separations using simple materials and basic tools. These solutions work well for renters or anyone wanting flexible space divisions.
Best DIY room divider ideas
Creating room separations doesn't require professional construction skills or expensive materials. Simple DIY room divider ideas use everyday items and basic techniques to get impressive results. The trick lies in choosing approaches that match skill level and intended function while working with existing décor.
Most successful projects focus on functionality first, then add decorative elements to make them look better. Room divider ideas DIY enthusiasts prefer often involve repurposing existing materials or combining multiple techniques for unique solutions.
Folding screens and curtains
Folding screens offer portable privacy solutions that work in various room setups. Building basic screens using wooden frames and fabric panels creates attractive dividers that fold flat when not needed. Canvas, burlap, or decorative fabrics stretched over simple frames provide both privacy and style.
Curtain-based room divider systems use ceiling tracks or tension rods to create flexible separations. Heavy fabrics work better than lightweight materials for creating substantial barriers.
Popular screen and curtain options:
- Hinged wooden frames covered with fabric or decorative paper
- Hanging fabric panels suspended from ceiling tracks
- Tension rod systems that need no permanent installation
- Accordion-style screens that expand and contract as needed
- Beaded or rope curtains for partial privacy with visual interest
Shelving and storage dividers
Bookshelf room dividers serve double duty by providing storage while creating separate spaces. Tall, narrow shelving units work well for separating living areas from dining spaces or creating office zones within larger rooms. Open shelving maintains flow while providing separation that actually works.
Storage-focused dividers maximize functionality by adding drawers, bins, or closed compartments alongside open shelving. These solutions work especially well in bedrooms, where bedroom sets might benefit from additional storage options that complement existing furniture pieces.
Simple box construction using plywood creates sturdy dividers that last years with proper assembly techniques.
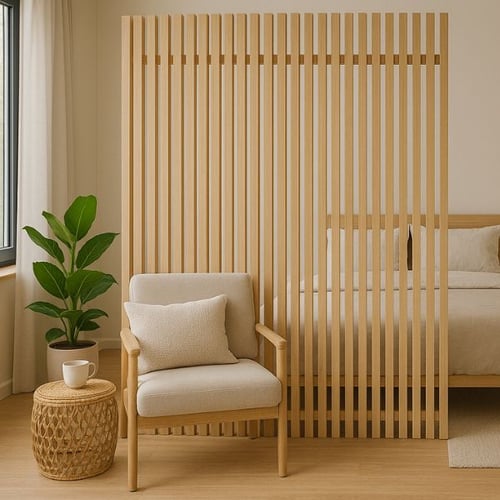
Upcycled doors and pallets
Old doors make excellent room dividers when repurposed creatively without much fuss. Vintage doors with interesting hardware or glass panels add character while providing substantial separation. Multiple doors connected with hinges create accordion-style dividers that fold completely away when not needed.
Wooden pallets offer cheap base materials for rustic-style dividers that look surprisingly good. Sanding, staining, or painting pallets transforms them into attractive separation walls.
Effective upcycling approaches include:
- Connecting multiple vintage doors with heavy-duty hinges
- Mounting doors on rolling bases for portable separation
- Stacking and securing wooden pallets to create tall dividers
- Adding fabric, plants, or lighting to enhance pallet constructions
- Combining different door styles for personalized dividers
How to make your own DIY room divider
Building custom room dividers allows complete control over size, materials, and appearance while often costing less than buying ready-made alternatives. Most room divider ideas can be completed using basic tools and materials from hardware stores.
Success depends on careful planning, accurate measurements, and choosing methods that match available skills.
Tools and materials you'll need
Basic room divider construction uses common household tools that most DIY enthusiasts already own. Hand tools work fine for most projects, though power tools speed things up when available. Having proper materials ready before starting prevents delays and ensures project completion.
Essential tools include measuring tape, level, drill, screwdriver, saw, and sandpaper for most divider projects. Material selection depends on chosen design and intended function - wood provides durability, while lightweight materials work better for temporary solutions.
Step-by-step building guide
Room divider construction follows similar basic steps regardless of chosen design or materials used. Planning and preparation prevent most common problems while ensuring results that look professional.
Start by measuring the space carefully and creating detailed plans that include dimensions and material requirements. Cut materials to size before beginning assembly, checking measurements twice to prevent costly mistakes. Sand rough edges before assembly to get smooth results that look finished properly.
Creative finishing touches
Basic room divider construction transforms into attractive design elements through thoughtful finishing techniques and decorative additions. Simple dividers become focal points when enhanced with creative paint treatments, fabric applications, or lighting solutions.
Paint, fabrics and textures
Paint selection dramatically impacts the final appearance of room divider projects. Bold colors create statement pieces, while neutral tones blend with existing décor seamlessly. Textured paint treatments add visual interest without overwhelming smaller spaces.
Fabric applications soften hard edges while adding color, pattern, and texture to basic constructions. Upholstering panels or incorporating textile elements transforms simple wooden frames into sophisticated features.
Creative finishing options contain:
- Chalk paint for vintage, distressed appearances that look authentic
- Geometric patterns using painter's tape and contrasting colors
- Fabric panels stretched over frames for soft, textured surfaces
- Rope or twine wrapping for natural, rustic textures
- Metallic accents using spray paint or leafing materials
Adding plants and lighting
Living elements like plants bring natural beauty to room divider designs while improving indoor air quality. Built-in planters, hanging systems, or shelf-mounted containers integrate greenery into divider constructions. Climbing plants work particularly well with trellis-style dividers.
Integrated lighting transforms room dividers from simple barriers into functional design features. LED strip lights or battery-operated accent lights add ambiance while providing practical illumination for nearby activities.
Divide spaces creatively
Successful room divider ideas combine practical space division with attractive design that enhances existing décor. DIY approaches offer flexibility and customization that ready-made alternatives often lack while costing significantly less. Creative thinking and basic construction skills transform simple materials into effective space solutions.
Author: Dako Furniture Team