Making your own bed frame puts you in complete control of design, size, and budget while creating something that fits your space exactly. Whether you're furnishing your first home or refreshing your bedroom, building your own bed frame opens up possibilities that ready-made furniture just can't match.
What to consider before building your own bed frame
Smart planning separates successful bed frame DIY projects from frustrating ones. Think honestly about your skill level, available workspace, and how much time you can realistically spend on the build. Consider what you actually need from your bed - maybe extra storage, a certain height, or a style that matches your room - and how it will fit with what you already have.
Choosing the right size – single, double, queen, or king
Your mattress size determines frame measurements, so getting this right matters for a proper fit. Sizes vary slightly between manufacturers, so measure your actual mattress rather than guessing from standard dimensions. Single frames suit kids' rooms or guest spaces well, while double frames work perfectly for smaller bedrooms.

Queen remains the most popular choice - it offers comfortable sleeping without dominating average bedrooms. King frames require bigger rooms and stronger construction because of their weight and dimensions. Don't forget to check doorways and stairs when planning larger frames that might need assembly in the bedroom.
Tools and materials you'll need for a wooden frame
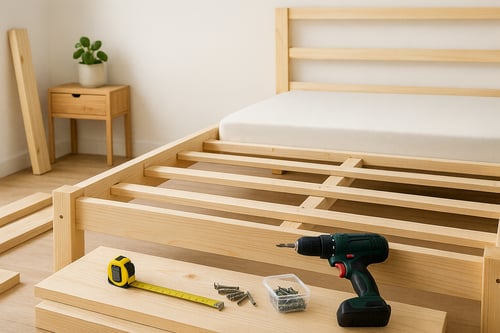
Most DIY wood bed frame projects use basic tools that many people already own or can easily borrow. You'll need something to cut timber - a saw works fine - plus a drill for screws and holes. Sandpaper smooths everything out, and a measuring tape keeps things accurate.
Wood choice affects both appearance and how long your frame lasts. Pine costs less and cuts easily, though it dents more than harder woods. Oak gives you strength and beautiful grain patterns but costs more. You can save money using cheaper wood for parts nobody sees.
Basic tools you'll need:
- Saw for cutting timber to length (any type works - circular, hand, or miter saw)
- Drill with screwdriver bits for putting things together and making pilot holes
- Sandpaper in different grits to smooth surfaces (start rough, finish smooth)
- Measuring tape, pencil, and square for marking accurate cuts
- Safety gear like glasses, gloves, and dust mask to protect yourself
Budget and time estimate for the project
Easy DIY bed frame projects typically cost much less than buying equivalent frames - sometimes half the price. Basic single frames might run £50-100 in materials, while queen or king versions usually cost £100-200 depending on your wood choices and how elaborate you get.
Time depends heavily on your design and experience. Simple platform frames can come together over a weekend, while fancier designs with storage or decorative touches might take several weeks of evening and weekend work. Don't forget to account for drying time if you plan to stain or paint.

How to build a DIY bed frame – step-by-step
Working in order ensures you end up with something strong and stable that lasts. Set up somewhere you can spread out materials and move around safely. Good lighting helps with accuracy, and ventilation matters when you get to sanding and finishing.
Step 1: Cut and prepare your timber pieces
Getting cuts right sets you up for success later. Double-check measurements before cutting - that old “measure twice, cut once” advice saves materials and headaches. Mark your cut lines clearly and aim for straight, square cuts, so everything fits together nicely.
Sand all pieces before you start assembly, working from rougher to smoother paper. This prep work goes much faster on individual pieces than after everything's connected. Cut ends usually need the most attention since they're often the roughest.
Step 2: Assemble the outer frame and support slats
Start with the head and foot sections, checking that corners are square by measuring diagonals - they should match. Drill small holes before adding screws to prevent splitting, especially near board ends. Adding wood glue to joints before screwing creates much stronger connections.
Slat spacing depends on your mattress - memory foam requires closer spacing than spring mattresses. Place slats across the frame, securing each one firmly. This foundation distributes weight evenly and prevents sagging over time.
Step 3: Attach legs or base supports for stability
Leg placement needs care to ensure everything sits level and stable. Corner legs work for most builds, though you'll want centre supports for larger frames or heavier mattresses. Use proper furniture screws rather than regular wood screws - they hold much better under load.
Platform bases skip legs entirely while giving excellent stability. These suit modern styles particularly well and can include storage underneath. Whatever base you choose, leave enough space from the floor for cleaning and airflow.
Step 4: Sand, paint or stain your frame for a finished look
Final sanding removes assembly marks and gets surfaces ready for finishing. Work through sandpaper grits systematically, cleaning off dust between each stage. This step makes a huge difference in how professional your finished frame looks.

Finishing options range from clear coats that show off wood grain to paint that matches your room colours. Water-based finishes dry faster with less smell, while oil-based ones last longer. Multiple thin coats always look better than one thick application.
Custom upgrades and design ideas
Personal touches separate DIY projects from store-bought furniture. Consider features that might improve both looks and function while staying within your abilities and budget.
Add a headboard or built-in shelves
Adding a headboard creates a more finished look while providing comfortable support for reading in bed. Simple plank designs suit farmhouse or rustic styles, while upholstered versions add softness and colour opportunities. Built-in shelving above or beside the bed maximizes space in smaller rooms.
DIY bed frame with storage options include drawer boxes under the platform or lift-up sections that reveal storage areas underneath. These features require more complex building but provide valuable storage in bedrooms short on closet space. Think about how storage access will work with your room layout and bedside tables positioning.
Paint ideas and finishes to match your bedroom style
Colour choice dramatically changes how your finished frame works with existing bedroom décor. Neutral colours like white, gray, or natural wood stains work with most decorating schemes and won't look dated as styles change. Bold colours can create dramatic focal points, but might limit future decorating flexibility.
Distressed finishes add character and can hide minor building imperfections that might show on smooth painted surfaces. Techniques like sanding through paint layers or applying dark wax over light base coats create aged looks that complement vintage or cottage-style decorating.
Think about how your frame will coordinate with other bedroom furniture, particularly existing beds if you're building for a guest room. Matching wood tones or complementary paint colours create cohesive looks that feel intentional rather than mismatched.
Popular finish options for bedroom use:
- Clear polyurethane for durable protection over stained wood surfaces
- Chalk paint for vintage, matte finishes that need minimal surface preparation
- Semi-gloss paint for easy cleaning and good durability in frequently used areas
- Natural oil finishes that enhance wood grain while providing gentle protection
Completing your custom bed frame project
Building your own bed frame transforms basic materials into furniture that reflects your style and effort. Taking care with finishing pays off - quality construction and finishing create something that competes with expensive store options while costing far less.
Explore more topics:
Author: Dako Furniture Team