A clean patio transforms the entire feel of a garden - and yet, it is one of those jobs that most people put off far longer than they should. The good news is that cleaning patio slabs does not require specialist equipment or expensive products. With the right approach for your slab type and the level of grime you are dealing with, the results can be remarkable. Here is everything you need to get your patio looking its best!
How to clean patio slabs: the best method for every situation
The right approach to how to clean patio slabs depends on what you are dealing with. General dirt calls for nothing more than a stiff brush and hot water, while moss, algae, and black spots require a dedicated treatment before scrubbing begins. Slab material matters too: porcelain handles most cleaning methods without issue, while natural stone is more porous and susceptible to damage from acidic cleaners. If your rattan garden furniture is still on the patio, move it aside first - it gives you clear access to the full surface and a chance to check the condition of the slabs beneath.
What you'll need before cleaning your patio
Gathering everything before you start makes the job considerably more straightforward. The specific products will depend on the method you choose, but the basic toolkit is the same regardless of approach.
Basic patio cleaning kit:
- Stiff-bristled brush or broom - for scrubbing and sweeping loose debris
- Garden hose or watering can - for rinsing and applying solutions
- Bucket - for mixing cleaning solutions
- Patio cleaner or washing-up liquid - depending on the method chosen
- Protective gloves - particularly important when using chemical-based cleaners
- Knee pads - useful for close scrubbing work on stubborn stains
Best way to clean patio slabs (step-by-step guide)
There is no single best way to clean patio slabs that apply to every situation - but for most domestic patios, a combination of pre-treatment, scrubbing, and rinsing produces consistently good results. Start by clearing the patio of all furniture and loose items, then sweep away any loose debris. Wet the surface thoroughly before applying any cleaning product, working methodically across the surface rather than tackling individual patches, which tends to leave visible tide marks once the patio dries.

Step-by-step patio cleaning method
How to clean paving slabs effectively, step by step:
- Clear and sweep - remove all furniture, pots, and debris before wetting the surface
- Pre-wet the slabs - dampen the entire area thoroughly with a hose or watering can
- Apply your cleaning solution - use a dedicated patio cleaner, a diluted bleach solution, or a natural alternative depending on your preference
- Allow to dwell - leave the solution to work for 10-20 minutes before scrubbing
- Scrub thoroughly - work in sections with a stiff brush, paying particular attention to joints and shaded areas
- Rinse completely - remove all traces of the cleaning solution with clean water before it dries
How to clean paving slabs without a pressure washer
Not everyone has access to a pressure washer, and for many slab types it is not necessary. Cleaning paving slabs without a pressure washer is entirely achievable with hot water and a good scrubbing brush - and for delicate natural stone, it is actually the preferred approach.
For everyday cleaning, a solution of washing-up liquid in hot water applied with a stiff brush removes general dirt and light staining effectively. For moss and algae, a diluted patio cleaner or a white vinegar solution applied and left to dwell for 20-30 minutes before scrubbing produces good results on most slab types. How to clean a patio without chemicals is simpler than most people assume, boiling water poured directly onto moss or weeds between joints kills them at the root without any product at all.
Natural and chemical-free patio cleaning methods
Natural cleaning methods are particularly well suited to gardens where children or pets use the patio regularly, or where runoff from chemical products could affect nearby planting.
Effective natural methods for cleaning a patio:
- Boiling water - poured directly onto moss, weeds, and algae, kills growth at the root with no chemical residue
- White vinegar solution - diluted 50/50 with water, effective on moss and general grime on most non-limestone surfaces
- Bicarbonate of soda paste - mixed with water and applied to stains, particularly effective on organic marks and light discolouration
- Salt - sprinkled onto damp moss and left overnight before brushing away, a simple and low-effort treatment
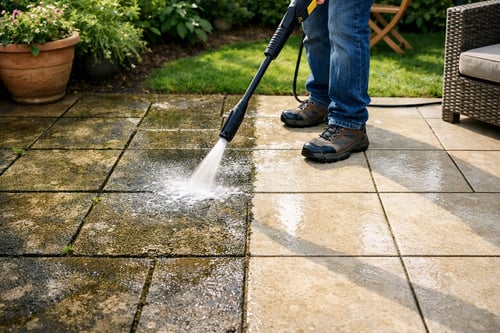
Pressure washing patio slabs: is it worth it?
Patio pressure washing is one of the fastest ways to restore a neglected patio - removing years of ingrained dirt, moss, and algae in a fraction of the time required by manual scrubbing. Whether it is worth the investment depends on the size of your patio and the slab material you are working with. Pressure washing is not suitable for all slab types: soft natural stone such as sandstone can be damaged by high-pressure water, while porcelain and concrete slabs handle it well.

How to pressure wash a patio safely
Technique matters as much as pressure when pressure washing patio slabs. Holding the nozzle too close or using too high a setting strips jointing material from between the slabs as well as the dirt, which creates gaps that allow weeds and moisture to establish more quickly.
Key tips for safe and effective patio pressure washing:
- Use the correct nozzle - a fan or rotary nozzle distributes pressure more evenly than a pinpoint setting
- Keep the nozzle moving - dwelling in one spot concentrates pressure and risks surface damage
- Work with the fall - direct water away from the house and towards drains or planted areas
- Maintain a consistent distance - around 30 cm from the surface is a good starting point for most domestic machines
- Re-point after washing - pressure washing loosens jointing compound; check joints once the patio dries and re-point where necessary
How to keep your patio slabs clean for longer
Regular, light maintenance prevents the build-up that makes cleaning a significant job. A quick sweep once a week removes the organic matter that moss and algae use to establish, and clearing your furniture periodically prevents the damp patches that develop under static pieces. A patio sealer applied after a thorough clean significantly reduces how quickly growth returns - most sealers need reapplying every two to three years, and our garden sofa sets pair well with a well-maintained surface, designed to complement an outdoor space you actually want to spend time in.
Preventing moss, algae and black spots
Moss, algae, and the stubborn black spots caused by lichen all thrive in the same conditions: shade, moisture, and organic debris. Reducing any one of these factors makes a meaningful difference to how quickly they return after cleaning.
Simple habits that keep patio slabs cleaner for longer:
- Sweep weekly - removing leaves and debris before they decompose eliminates the food source that moss and algae rely on
- Trim overhanging plants - reducing shade over the patio lowers the moisture levels that encourage growth
- Clear standing water - any low spots where water pools after rain are priority areas for moss treatment
- Apply a moss inhibitor - a seasonal treatment applied after cleaning keeps regrowth at bay for several months
- Move furniture regularly - static furniture creates persistently damp patches; shifting it occasionally prevents localised growth
From cleaning to enjoying: making your patio work for you
Keeping your patio in good condition is not just about appearances - it is about getting the most from an outdoor space that has the potential to be one of the best parts of your home. A surface that is clean, well-maintained, and properly furnished becomes somewhere you will genuinely want to spend time, season after season. The methods above cover every situation from a light seasonal refresh to a full deep clean, so whatever your patio looks like right now, there is a straightforward route to getting it looking its best.
Explore more topics:
Author: Dako Furniture Team